Order Block Trading: The Complete SMC Guide
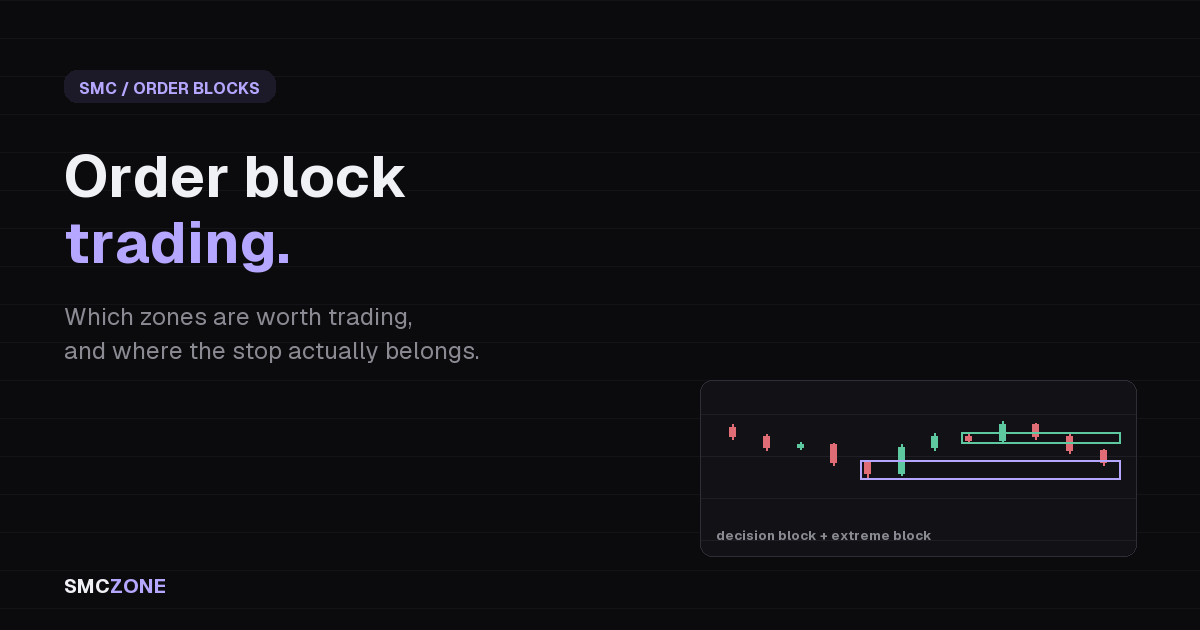
Order block trading means buying or selling from the candle zone where a big move began. You mark the last opposite candle before an impulse that broke market structure, wait for price to come back into that zone, and take the trade with your stop behind it. The zone is your point of interest, not a signal by itself.
Most explanations of order block trading stop at "the last down candle before the move up." That rule alone marks a dozen zones on every chart, and most of them do nothing. The conditions that separate a block price respects from one it slices through rarely make it into writing, which is why so many traders conclude the concept is broken when their marking is.
So: the validation rules, which blocks to leave alone, a seven-step workflow, stop and target placement with a worked example, and why good setups still fail.
What is an order block in trading?
An order block is the candle zone where a large move started. In Smart Money Concepts (SMC), the structure-based approach popularised by Inner Circle Trader (ICT), it is drawn on the last opposite candle before an impulse: the last bearish candle before a strong rally, or the last bullish candle before a sharp drop. Traders mark that candle's range as a zone and watch for a reaction when price returns.
The logic is simple. Large positions cannot be filled in one click at one price. When price runs away from a level, part of that interest stays unfilled, and a return to the same area is where the rest of the business tends to get done. Whether that story is literally true on any given chart is beside the point. What it gives you is testable: a zone with an edge you can measure from, and a level that says you were wrong. For the plain-English version of the concept, see what is an order block.
What makes an order block valid?
Three conditions. The candle has to take liquidity from the candle before it (its wick runs past that candle's high or low). The move away from it has to leave an unfilled imbalance, a gap between the wicks of the surrounding candles. And that move has to break structure, printing a break of structure (BOS, continuation) or a change of character (CHoCH, reversal) on a candle close.
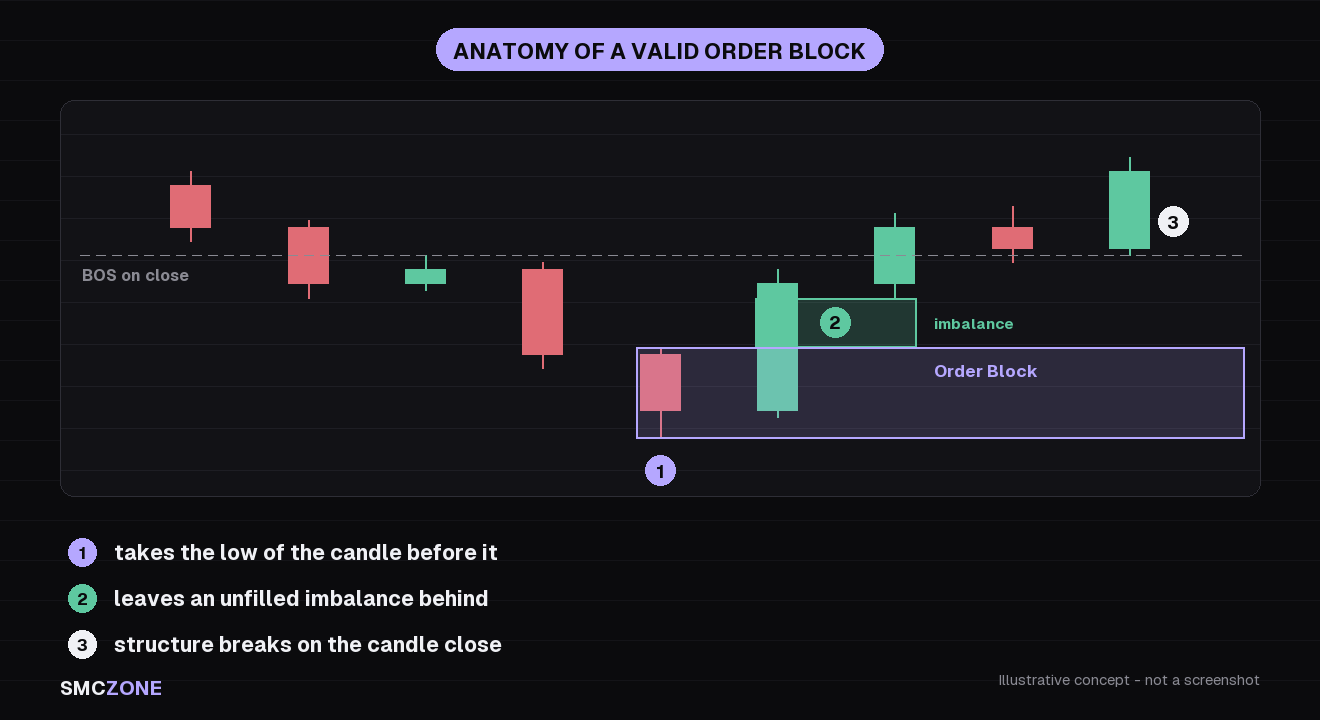
Miss any one of those and you are marking a random candle. The imbalance condition does the most work in practice. If the candle you picked has no unfilled gap after it, move forward one candle in the impulse and check again, and keep moving until you find the one that does. That single habit removes a large share of the zones that "should have held."
The structural break matters for the same reason. A candle followed by a drift sideways is just a candle. A candle followed by a move that takes out the previous swing point on a close is the origin of something the market actually respected. Note the phrase on a close: a wick through a level is a liquidity sweep, not a confirmed break, and structure is only ever marked to the left of price. If it has not printed yet, it does not exist. More on that in market structure explained.
Which order blocks are actually worth trading?
Not all of them, and this is where most order block trading goes wrong. In a single leg you will find several valid blocks. Two of them carry weight: the first one after the inducement, and the last one before the structural break. Everything in between tends to act as bait.
The inducement (IDM) is the last pullback before the move, the shallow retracement that pulls in early entries and parks their stops in an obvious place. Those stops are the fuel for the liquidity sweep that usually precedes the real leg. The first block after that inducement is the decision block: the zone where the move committed. The last block before the break is the extreme block: the deepest origin of the leg, and the one price often reaches for when the shallow zones fail.
| Block in the leg | What it is | Trade it? |
|---|---|---|
| Decision block (first after the inducement) | Where the move committed after the inducement was taken | Yes, primary zone |
| Extreme block (last before the structural break) | The deepest origin of the leg | Yes, deeper alternative |
| Blocks in between | Intermediate zones with no liquidity underneath them | Skip, these are the traps |
| Already mitigated block | Price returned and reacted once already | Skip, the interest there is spent |
One more filter before you take anything: check where the zone sits in the leg. Split the impulse in half. A long from a block in the lower half (discount) and a short from a block in the upper half (premium) put you on the cheaper side of the move. A long from the top of the range is chasing, however clean the zone looks.
How to trade an order block step by step
Same routine every time, in the same order. The point is that the trade is decided before price arrives, not while you are watching it tick.
- Read structure on your higher timeframe first. Higher highs and higher lows means you only look for bullish blocks; lower highs and lower lows means bearish only.
- Find the impulse that broke structure, and confirm the break happened on a candle close rather than a wick.
- Walk back to the last opposite candle before that impulse. Check that its wick took the previous candle's low (for a bullish block) or high (for a bearish one).
- Check that the move away from the candle left an unfilled imbalance. If it did not, move forward one candle in the impulse and check again.
- Mark the zone across the full range of that candle, wick to wick. Then place it: first after the inducement, last before the break, or something in between that you skip.
- Wait for price to return and close a candle inside the zone. A wick that pokes in and leaves is not mitigation, it is a sweep.
- Take the entry on your lower-timeframe confirmation, set the stop behind the far edge of the zone plus a buffer, and size the position from that stop distance.
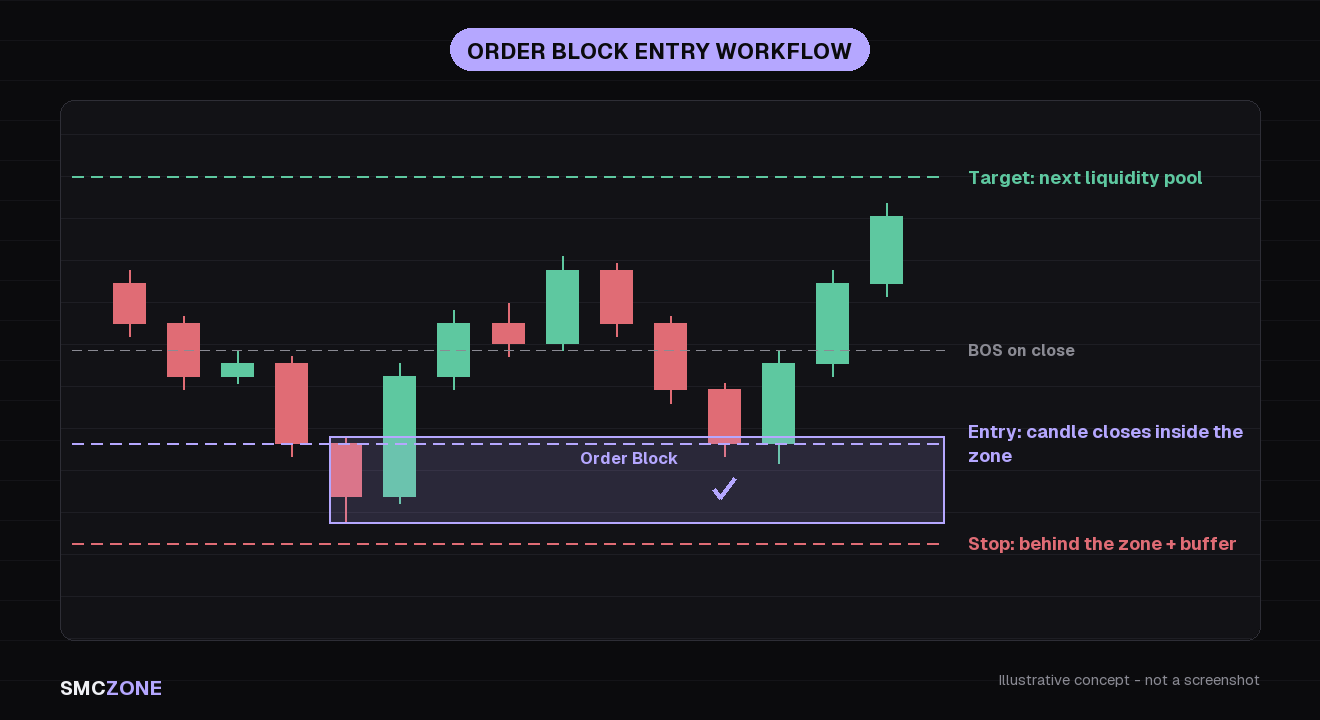
Step 7 is where accounts are won or lost, and it deserves its own detail. The full entry sequence, including lower-timeframe confirmation patterns, lives in the order block trading strategy guide. If you are still building the marking habit, work through how to identify order blocks first.
Where do you place the stop and the target?
The stop goes behind the far edge of the zone, past the wick that took liquidity, with a small buffer for spread and noise. The target is the next pool of liquidity in the direction of the trade: the swing high or low that has obvious stops sitting behind it. Both levels come from the chart. Neither comes from the number you would like your risk to be.
Here is a bullish example on EURUSD, illustrative numbers on an H1 chart:
| Element | Level | Reasoning |
|---|---|---|
| Order block zone | 1.0820 to 1.0840 | Last bearish candle before the impulse that broke structure |
| Liquidity taken | 1.0814 | The block candle swept the low of the candle before it |
| Entry | 1.0838 | Candle closed inside the zone, confirmation on the lower timeframe |
| Stop | 1.0808 | 6 pips past the sweep wick, 30 pips of risk |
| Target 1 | 1.0900 | Previous swing high, 62 pips, roughly 2R |
| Target 2 | 1.0960 | Next liquidity pool above, 122 pips, roughly 4R |
Read that table as a plan, not a result. The 4R is what the chart offers if price gets there; how often it does is a question for your own journal, on your own instrument and timeframe. What the plan does guarantee is that the loss is known before entry, which is the part you control. If a 30-pip stop is too much for your account, the fix is a smaller position, never a tighter stop pulled inside the zone.
Order block vs fair value gap vs breaker block
These three objects sit next to each other on the chart and get used interchangeably, which causes real confusion at the entry.
| Order block | Fair value gap | Breaker block | |
|---|---|---|---|
| What it is | Last opposite candle before the impulse | Three-candle imbalance left by the impulse | An order block that failed and got flipped |
| Marked from | The candle's full range, wick to wick | The gap between candle 1 and candle 3 wicks | The failed block's range, now used from the other side |
| What it tells you | Where the move originated | Where the move was inefficient | That the previous story was wrong |
| Typical use | Primary entry zone | Confluence, or a shallower entry | Continuation entry after the flip |
In practice they work together. A valid order block usually has a fair value gap right after it, and the overlap of the two is a tighter, higher-confluence area than either alone. Detail on the gap side is in what is a fair value gap, and the flip case is covered in order block vs breaker block.
Why do order block trades fail?
Because a zone is a probability, not a promise, and because most of the failures trace back to a handful of repeatable habits. Price runs through valid blocks all the time, particularly against a strong higher-timeframe trend or into a scheduled news release. That is normal, and it is why the stop exists.
Pros
- Only trading blocks that point the same way as higher-timeframe structure
- Checking the imbalance condition before marking the zone
- Waiting for a candle to close inside the zone
- Taking the decision block or the extreme block, skipping the middle
- Letting the stop come from the chart and the size come from the risk
Cons
- Entering the moment a wick touches the zone
- Marking a block that has no imbalance behind it
- Trading a shallow block against the higher-timeframe direction
- Widening the stop after entry to avoid being wrong
- Using a tool that redraws its zones after the fact
One failure mode is not the market's fault at all. If your marking tool redraws zones after the candle closes, the chart you review tonight is not the chart you traded this morning, and your journal quietly stops meaning anything. That is a solvable problem, and the non-repaint test takes about a minute to run.
How SMCZone marks order blocks
Marking blocks by hand is slow and subjective. Two traders looking at the same impulse routinely draw two different zones, usually because one of them skipped the imbalance check. Money Hunter marks the structure and the blocks for you on TradingView and MetaTrader 4/5: inducement, BOS and CHoCH, the decision block (OB-IDM), the extreme block (OB-EXT) and the previous block, so the "which one do I trade" question is answered on the chart rather than by feel.
It is non-repaint by code: a zone is finalised when the candle closes and is never redrawn afterwards. You can verify that yourself with a 100-bar replay test before you trust a single alert from it. Our pick of tools for the same job, ours included, is compared in the best order block indicator for TradingView.
FAQ
How do you trade an order block?
Mark the last opposite candle before an impulse that broke structure, then wait for price to return and close a candle inside that zone. Enter on the reaction, put the stop behind the far edge of the block, and target the next pool of liquidity.
What makes an order block valid?
Three things: the candle took liquidity from the candle before it, the move away from it left an unfilled imbalance, and that move broke structure. If there is no imbalance after the candle, it is not the block. Move forward to the next candle of the impulse.
Which order block should I trade?
The first block after the inducement (the decision block) and the last block before the structural break (the extreme block). Blocks sitting between those two usually get run before price reaches a real zone.
Where do you place the stop loss on an order block trade?
Behind the far edge of the zone, with a small buffer past the wick that took liquidity. If that stop makes the trade too big for your risk, reduce the position size instead of tightening the stop.
Do order blocks always work?
No. Price ignores plenty of valid blocks, especially against a strong trend or into a news release. An order block tells you where a reaction is more likely, not that one is coming. Position size and invalidation still decide the outcome.
Frequently asked questions
How do you trade an order block?
Mark the last opposite candle before an impulse that broke structure, then wait for price to return and close a candle inside that zone. Enter on the reaction, put the stop behind the far edge of the block, and target the next pool of liquidity.
What makes an order block valid?
Three things: the candle took liquidity from the candle before it, the move away from it left an unfilled imbalance, and that move broke structure. If there is no imbalance after the candle, it is not the block. Move forward to the next candle of the impulse.
Which order block should I trade?
The first block after the inducement (the decision block) and the last block before the structural break (the extreme block). Blocks sitting between those two usually get run before price reaches a real zone.
Where do you place the stop loss on an order block trade?
Behind the far edge of the zone, with a small buffer past the wick that took liquidity. If that stop makes the trade too big for your risk, reduce the position size instead of tightening the stop.
Do order blocks always work?
No. Price ignores plenty of valid blocks, especially against a strong trend or into a news release. An order block tells you where a reaction is more likely, not that one is coming. Position size and invalidation still decide the outcome.